SpringBoot入门笔记
SpringBoot
学习来源于多方结合:狂神说、黑马
简介
相关文档
为什么从spring升级到spring boot?
spring的缺点:
配置繁琐
虽然Spring的组件代码是轻量级的,但它的配置却是重量级的。一开始,Spring用XML配置,而且是很多XML配置。Spring2.5引入了基于注解的组件扫描,这消除了大量针对应用程序自身组件的显式XML配置Spring3.0引入了基于Java的配置,这是一种类型安全的可重构配置方式,可以代替XML。所有这些配置都代表了开发时的损耗。因为在思考Sphr管资 解决业务问题之间需要进行思维切换,所以编写配置挤占了编写应用程序逻辑的时间。和所有框架一样,Spring实用,但它要求的回报也不少
依赖繁琐
项目的依赖管理也是一件耗时耗力的事情。在环境搭建时,需要分析要导入哪些库的坐标,而且还需要分析导入与之有依赖关系的其他库的坐标,一旦选错了依赖的版本,随之而来的不兼容问题就会严重阻碍项目的开发进度(比如我在tomcat版本选择上就被折腾好久)
springboot功能
自动配置
Spring Boot的自动配置是一个运行时(更准确地说,是应用程序启动时)的过程,考虑了众多因素,才决定Spring配置应该用哪个,不该用哪个。该过程是SpringBoot自动完成的。起步依赖
起步依赖本质上是一个Maven项目对象模型(ProjectObject Model,POM),定义了对其他库的传递依赖这些东西加在一起即支持某项功能。
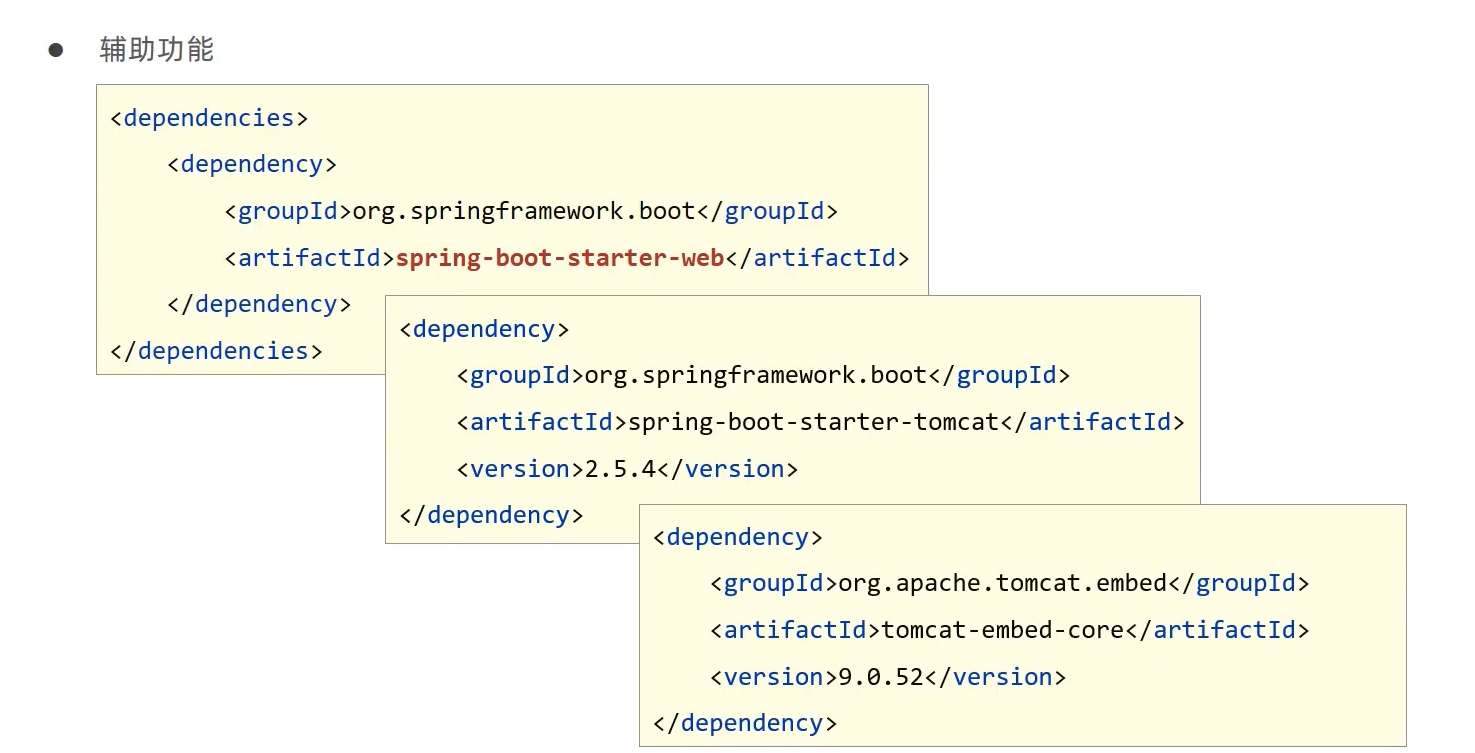
简单的说,起步依赖就是将具备某种功能的坐标打包到一起,并提供一些默认的功能。辅助功能
提供了一些大型项自中常见的非功能性特性,如嵌入式服务器、安全、指标,健康检测、外部配置等
第一个SpringBoot程序
原理 -》
p12- 自动装配原理再理解
b站雷神进行复盘学习
四大入门了解点
parent和starter是关乎包依赖与管理的相关内容,引导类主要用于初始化SpringBoot容器,内嵌tomcat可以免去我们配置服务器的繁琐过程
parent
1
2
3
4
5
6
7
8
<!--todo 父依赖,详细依赖可通过relativePath查看
以后我们导入依赖默认是不需要写版本;但是如果导入的包没有在依赖中管理着就需要手动配置版本了-->
<parent>
<groupId>org.springframework.boot</groupId>
<artifactId>spring-boot-starter-parent</artifactId>
<version>2.7.3</version>
<relativePath/> <!-- lookup parent from repository -->
</parent>starter
1
2
3
4
5<dependency>
<groupId>org.springframework.boot</groupId>
<!--todo 帮我们导入了web模块正常运行所依赖的组件-->
<artifactId>spring-boot-starter-web</artifactId>
</dependency>引导类
1
2
3
4
5
6
7
8
9
10
11
12
13
14
15
16
17
package com.example.springboot01helloworld;
import org.springframework.boot.SpringApplication;
import org.springframework.boot.autoconfigure.SpringBootApplication;
public class SpringBoot01HelloWorldApplication {
public static void main(String[] args) {
//todo 1. SpringBoot 工程提供引导类来启动程序
//todo 2. SpringBoot 工程启动后创建并初始化Spring容器
ConfigurableApplicationContext context = SpringApplication.run(SpringBoot03WebApplication.class, args);
Hello bean = context.getBean(Hello.class);
System.out.println("bean ==>" + bean);
}
}内嵌tomcat
若想更换其他服务器,如jetty
内嵌Tomcat服务器是SpringBoot辅助功能之一
内嵌Tomcat工作原理是将Tomcat服务器作为对象运行,并将该对象交给Spring容器管理
变更内嵌服务器思想是去除现有服务器,添加全新的服务器
SpringBoot配置
01、02
1 | # todo 更改项目的端口号 |
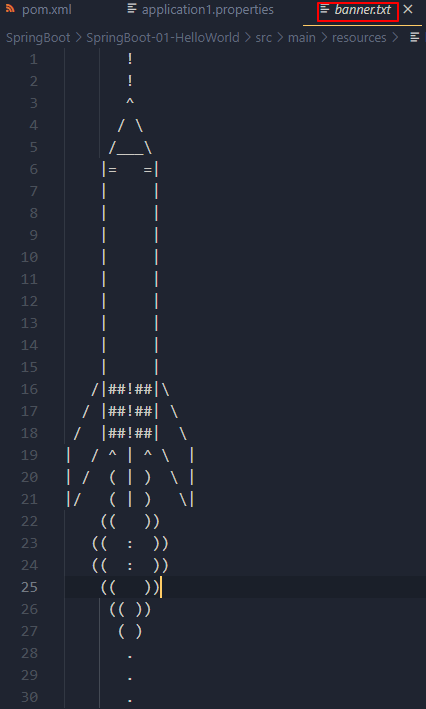
可以通过自定义banner.txt来创建diy启动图标,命名必须为banner
JSR303
在pom文件中引入校验包
1
2
3
4
5
6<!--todo 引入校验包-->
<dependency>
<groupId>org.springframework.boot</groupId>
<artifactId>spring-boot-starter-validation</artifactId>
<version>2.2.13.RELEASE</version>
</dependency>类中注解表示需要校验
1
2//todo 数据校验
public class Person {}需要校验的变量进行注解,message为错误提示
1
2
private String name;yaml数据格式
- 大小写敏感
- 属性层级关系使用多行描述,每行结尾使用冒号结束
- 使用缩进表示层级关系, 同层级左侧对齐,只允许使用空格(不允许使用Tab键)
- 属性值前面添加空格 (属性名与属性值之间使用冒号+空格作为分隔)
- #表示注释
语法规则:
最好按照规范书写 (比如字符串就用双引号括起来,不要直接书写,因为可能会被解析为进制数字),否则可能会出现意料之外的错误
1 | boolean: TRUE #TRUE, true, True, FALSE,false, False均可 |
数组以及对象的书写方式(简写方式类似于json)
1 | #对象 |
SpringBoot相关配置:
1 | # 项目端口号 |
注入到配置类
创建一个类并注入到spring容器中
1
2
3
4
5
6
7
8
9
10
11
12//todo 定义为Spring管理的bean
public class Person {
private String name;
private int age;
private Boolean happy;
private Date birthday;
private Map<String, Object> maps;
private List<Object> lists;
private Dog dog;
}在配置文件中定义其相关属性,属性分别对应类的各个成员变量,若无对应值则默认为
null其中:
random.可以产生随机数,这里产生一个随机uuid、person.dogName:hello可以进行二元判断,若person.dogName有赋值则取,若无则使用hello_旺财1
2
3
4
5
6
7
8
9
10
11
12person:
#插入语句
name: nihao${random.uuid}
age: 18
happy: false
birthday: 2022/09/02
maps: {k1: v1, k2: v2}
lists: [girl,game,sleep]
dog:
#判断语句
name: ${person.dogName:hello}_旺财
age: 3在类中注入该属性
@ConfigurationProperties(prefix = "属性名")1
2
3
4
5
6//todo 定义为Spring管理的bean
//todo 引用指定属性
public class Person {
}若是采用properties类型的配置文件,则使用以下方式配置
1 | //todo 定义为Spring管理的bean |
test.properties
1 | name=pig |
多环境配置以及配置环境设置
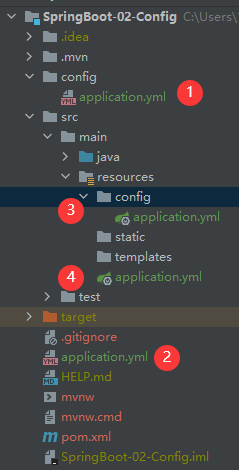
当有多个application.yml配置文件时,应创建的目录以及优先级(按图中所示进行优先级排序)如下
作用:
- 1级与2级留做系统打包后设置通用属性,1级常用于运维经理进行线上整体项目部署方案调控
- 3级与4级用于系统开发阶段设置通用属性,3级常用于项目经理进行整体项目属性调控
各级文件作用
- 项目类路径配置文件:服务于开发人员本机开发与测试
- 项目类路径config目录中配置文件:服务于项目经理整体调控
- 工程路径配置文件:服务于运维人员配置涉密线上环境
- 工程路径config目录中配置文件:服务于运维经理整体调控
properties、yml、yaml的优先级(配置文件)
- properties > yml > yaml
- 同个配置会按上面排序进行优先级,不同配置,即使处于不同文件里,都可以生效
多环境配置
方案一:声明不同文件进行存储
测试环境
application-test.properties
1
server.port=8086
开发环境
application-dev.properties
1
server.port=8088
主文件使用
application.yml
1
2
3spring:
profiles:
active: test结果:
优点
- 可以使用独立配置文件定义环境属性
- 独立配置文件便于线.上系统维护更新并保障系统安全性
方案二
直接在当个文件中定义不同环境
application.yml
1
2
3
4
5
6
7
8
9
10
11
12
13
14
15
16
17
18
19server:
port: 8084
spring:
profiles:
active: test
#开发环境
server:
port: 8090
spring:
profiles: dev
#测试环境
server:
port: 8099
spring:
profiles: test
根据功能对配置文件中的信息进行拆分,并制作成独立的配置文件
命名规则如下
- application-devDB.yml
- application-devMVC.yml
- application-devRedis.yml
使用include属性在激活指定环境的情况下,同时对多个环境进行加载使其生效,多个环境间使用逗号分隔
1 | spring: |
针对不同环境对应的不同配置文件,可以使用下面的方法
1 | spring: |
注意,上述两种方式在加载时文件的加载顺序不一样
如果在虚拟机可以使用以下方式指定环境:-Dspringprofiles.active=dev
在命令行的话可以通过参数java-jarxxx.jar --spring.profiles.active=dev去激活想要的配置
Maven与SpringBoot多环境冲突现象解决方案
当Maven与SpringBoot同 时对多环境进行控制时,以Mavn为主,SpringBoot使用@. .@占位符读取Maven对应的配置属性值
pom.xml
1
2
3
4
5
6
7
8
9
10
11
12
13
14
15
16
17
18<profiles>
<profile>
<id>env_dev</id>
<properties>
<profile.active>dev</profile.active>
</properties>
</profile>
<profile>
<id>env_pro</id>
<properties>
<profile.active>pro</profile.active>
</properties>
<activation>
<activeByDefault>true</activeByDefault>
</activation>
</profile>
</profiles>application.yml
1
2
3
4
5
6
7
8
9
10server:
port: 8868
spring:
profiles:
active: @profile.active@
#include: devMVC,devDB
group:
dev: devMVC, devDB
pro: proMVC, proDB基于SpringBoot 读取Maven配置属性的前提下,如果在Idea下测试工程时pom.xml每次更新需要手动compile方可生效
profile外部配置方式
打包后代码里面的config和根路径的properties是不会一起打包的,但可以在jar包路径下同个相对路径进行配置,优先级同开发阶段一致
Web开发
jar: webapp
自动装配
- 在SpringBoot中,我们可以使用以下方法处理静态资源
- webjars
- public
- static
- /**
- resources
- 优先级resources > static > public
可以通过自定义默认路径处理静态资源文件
application.properties
1 | spring.mvc.static-path-pattern=/hello/,classpath:/example/ |
整合junit
04
1 | /** |
整合mybatisc
05
整合到springboot的依赖一般使用方式为
- 导包
- 配置
- 使用
整合mybatis-plus
06
整合Druid
05
综合案例SSM
07
步骤
实体类开发:使 用Lombok快速制作实体类
Dao开发:整合MyBatisPlus, 制作数据层测试类
Service开发:基于MyBatisPlus进行增量开发,制作业务层测试类 ➡ BookServiceImpl
- Service接口名称定义成业务名称,并与Dao接口名称进行区分
- 制作测试类测试Service功能是否有效
- 快速开发方案 ➡ BookService2Impl
- 使用MyBatisPlus提供有 业务层通用接口(ISerivce
) 与业务层通用实现类(ServiceImpl<M,T>) - 在通用类 基础上做功能重载或功能追加
- 注意重载时不要覆盖原始操作,避免原始提供的功能丢失
- 使用MyBatisPlus提供有 业务层通用接口(ISerivce
Controller开发:基于Restfu1开发,使用PostMan测试接口功能 -> BookController
Controller开发: 前后端开发协议制作 -> BookController02
设计统一的返回值结果类型便于前端开发读取数据
返回值结果类型可以根据需求自行设定,没有固定格式
返回值结果模型类用于后端与前端进行数据格式统一,也称为前后端数据协议
1
2
3
4{
"flag": true,
"data": []
}设计表现层返回结果的模型类,用于后端与前端进行数据格式统一,也称为前后端数据协议
页面开发:基于VUE+ElementUI制作, 前后端联调,页面数据处理, 页面消息处理
- 列表、 新增、修改、删除.分页、查询
项目异常处理
按条件查询:页面功能调整、Controller修正功能、Service修正功能
运维实用
打包(windows)
对项目进行打包
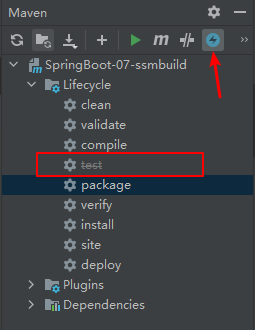
使用idea
可以通过箭头所指方向对test指令进行屏蔽,避免打包过程执行一堆不希望执行的test操作
使用cmd
1
mvn package
打包文件为一个jar包,执行该文件可以通过cmd进行
1
java -jar jar包名.jar
指定端口(可以通过–命令去更改属性,属性名格式同yml配置文件)
1
java -jar jar包名.jar --server.port=8868
注意:jar支持命令行启动需要依赖maven插件支持,请确认打包时是否具有SpringBoot对应的maven插件,否则运行该包会出现异常(不过一般情况下创建项目就会自动引入该包了)
1
2
3
4
5
6
7
8<build>
<plugins>
<plugin>
<groupId>org.springframework.boot</groupId>
<artifactId>spring-boot-maven-plugin</artifactId>
</plugin>
</plugins>
</build>win环境下端口的命令行操作
查询端口
netstat -ano查询指定端口
netstat -ano |findstr "端口号"根据进程PID查询进程名称
tasklist |findstr "进程PID号"根据PID杀死任务
taskkill /F /PID "进程PID号”根据进程名称杀死任务
taskkill -f -t -im "进程名称"
临时属性
- 使用jar命令启动SpringBoot工程时可以使用临时属性替换配置文件中的属性
- 临时属性添加方式:
java -jar工程名.jar --属性名=值 - 多个临时属性之间使用空格分隔
- 临时属性必须是当前boot工程支持的属性,否则设置无效
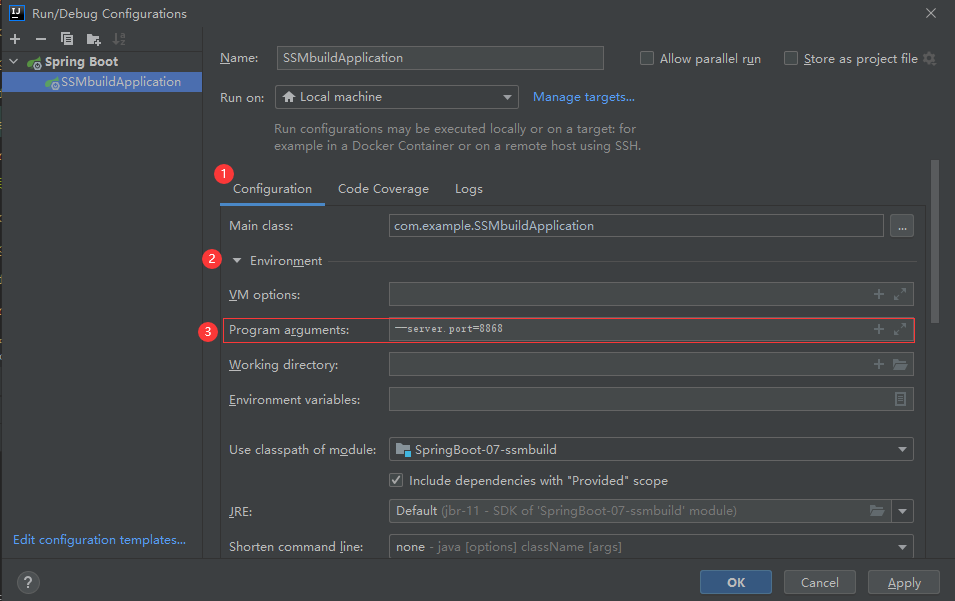
临时属性在idea下的测试
在程序的主入口函数,我们可以看到args形参,args为外部临时环境的传入参数存储的数组
若不想外部设置环境参数可以在run方法内去掉args
1 |
|
打包(Linux)
运维实用篇-53-Boot工程快速启动(Linux版)_哔哩哔哩_bilibili
自定义配置文件
当前路径
--spring.config.name=文件名
指定路径
--spring.config.location=classpath:/文件名.文件后缀
多环境开发
日志
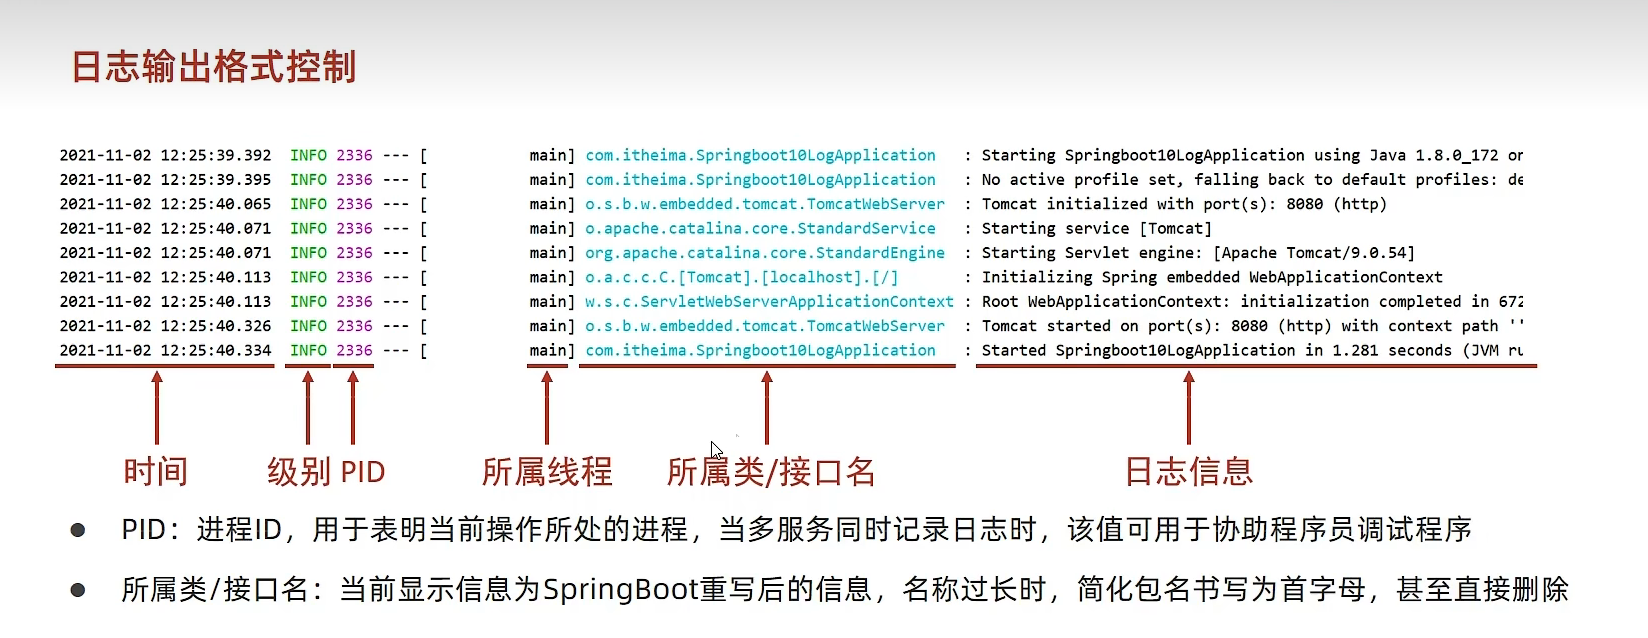
日志输出格式
开发实用
热部署
手动启动热部署
首先定义启用热部署的坐标-开发者工具
1
2
3
4
5<!--todo 热部署-sp相关开发者工具坐标添加-->
<dependency>
<groupId>org.springframework.boot</groupId>
<artifactId>spring-boot-devtools</artifactId>
</dependency>使用方式:在修改源程序后,选择以下选项进行手动热部署
或者,快捷键:
ctrl + f9
注意:热部署仅仅加载当前开发者自定义开发的资源,不加载jar资源
自动启动热部署
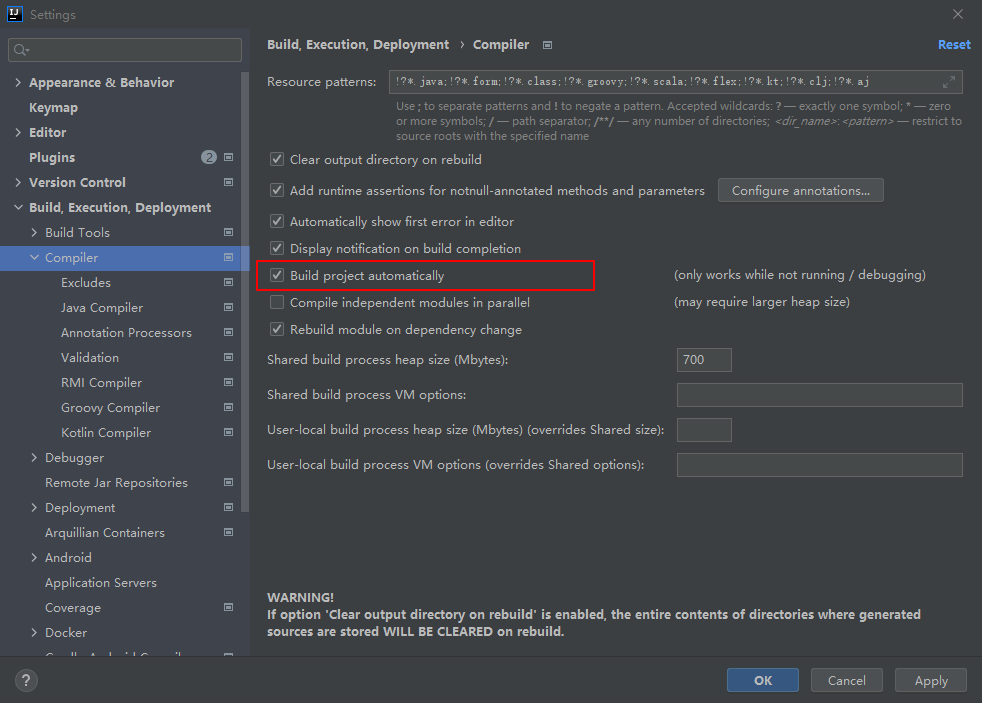
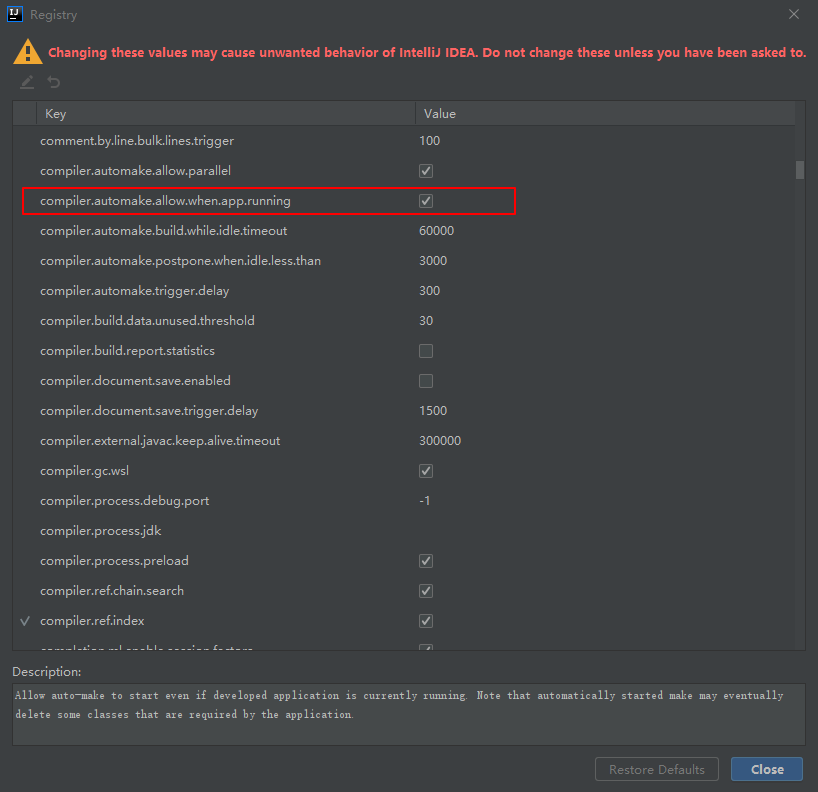
在设置中打开相关选项
ctrl + alt + shift + /选择第一个选项,打开下面窗口,将下面选项勾选重启使用即可
热部署范围配置
默认不触发重启的目录列表
- /META- INF /maven
- /META- INF/resources
- /resources
- /static
- /public
- /templates
配置不参与热部署的文件或文件夹
1 | spring: |
其中:
- 文件夹设置方式为:
文件夹名/** - 文件设置方式:文件相对路径/文件名.后缀
关闭热部署
方式一:yml文件配置,缺点是你配置的可能会被别人覆盖
1
2
3
4
5
6spring:
#设置不参与热部署的文件或文件夹
devtools:
restart:
#禁用热部署
enabled: false方式二:在应用主启动程序禁用该选项
1
2
3
4
5
6
7
8
public class SpringBoot10HotDeployApplication {
public static void main(String[] args) {
//todo 禁用热部署
System.setProperty("spring.devtools.restart.enabled", "false");
SpringApplication.run(SpringBoot10HotDeployApplication.class, args);
}
}配置高级
@ConfigurationProperties
将配置文件属性注入到自定义类中
自定义类
1
2
3
4
5
6
7
8
9
10
11
12
13
14package com.example.config;
import lombok.Data;
import org.springframework.boot.context.properties.ConfigurationProperties;
import org.springframework.stereotype.Component;
//@Component
public class ServerConfig {
private String ipAddress;
private int port;
private long timeout;
}配置文件属性
1
2
3
4servers:
ipAddress: https://192.168.0.0
port: 8888
timeout: 3000在主应用程序进行测试
1
2
3
4
5
6
7
8
9
10
11
12
public class SpringBoot11ConfigurationApplication {
public static void main(String[] args) {
ConfigurableApplicationContext ctx = SpringApplication.run(SpringBoot11ConfigurationApplication.class, args);
ServerConfig bean = ctx.getBean(ServerConfig.class);
System.out.println(bean);
}
}引入第三方包进行属性配置(以druid为例)
引包
1
2
3
4
5<dependency>
<groupId>com.alibaba</groupId>
<artifactId>druid</artifactId>
<version>1.2.11</version>
</dependency>在SpringBoot11ConfigurationApplication进行注入
1
2
3
4
5
6
7
//配置文件注入
public DruidDataSource dataSource() {
DruidDataSource ds = new DruidDataSource();
//ds.setDriverClassName("test123");//java方式注入
return ds;
}如选择配置文件注入,则在配置文件设置属性
1
2datasource:
driverClassName: test123456测试,同自定义类方式一致
1
2DruidDataSource bean1 = ctx.getBean(DruidDataSource.class);
System.out.println(bean1.getDriverClassName());
@EnableConfigurationProperties:
@EnableConfigurat ionProperties注解可以将使用@ConfigurationProperties注解对应的类加入Spring容器
拿的前面自定义类的样例
1 | //@Component //被注入目标定义EnableConfigurationProperties则可以省去,否则出现两个同名bean会报错 |
1 |
|
注意:@EnableConfigurationProperties与@Component不能同时使用
测试遇到问题的解决方式
宽松绑定/松散绑定
@ConfigurationProperties绑定属性支持属性名宽松绑定
1 | servers: |
以上所有格式都可以被识别,但最推荐的为烤肉串模式,其他有注解的格式也推荐
注意:
宽松绑定不支持注解@Value引用单个属性的方式
1
2
3
4
5
6
7
8
9
10
class SpringBoot11ConfigurationApplicationTests {
//宽松绑定不支持注解@Value引用单个属性的方式
private String msg;
void contextLoads() {
System.out.println(msg);
}
}绑定前缀名命名规范:仅能使用纯小写字母、数字、下划线作为合法的字符
1
2
3
4
5
6//绑定前缀名命名规范:仅能使用纯小写字母、数字、下划线作为合法的字符
public DruidDataSource dataSource() {
DruidDataSource ds = new DruidDataSource();
//ds.setDriverClassName("test123");
return ds;
}常用计量单位绑定
1 | //设置数据格式:时间数据格式 |
数据校验
补充JSR303
步骤
导入JSR303与Hibernate校验框架坐标
1
2
3
4
5
6
7
8<dependency>
<groupId>javax.validation</groupId>
<artifactId>validation-api</artifactId>
</dependency>
<dependency>
<groupId>org.hibernate.validator</groupId>
<artifactId>hibernate-validator</artifactId>
</dependency>使用@Validated注解启用校验功能
1
2
3
4
public class ServerConfig {}使用具体校验规则规范数据校验格式
1
2
3
4
5
6
7
8
public class ServerConfig {
private String ipAddress;
//校验
private int port;
}获取配置文件属性值
第一种方式:直接通过注解获取
1 | ("$(person.name)") |
第二种:通过注入enviroment环境变量去获取并读取
1 |
|
第三种:通过ConfigurationProperties注解获取引用的数据
1 |
|
测试
加载测试专用属性
注入属性
1
注入命令行形式属性
1
直接读取配置文件属性
1
2//todo 1.手动注入配置文件
private String testV; //todo 读取属性这三种的优先级为1>2>3
加载测试专用配置
使用@Import注解加载当前测试类专用的配置
先定义一个配置型测试类
1
2
3
4
5
6
7
8
public class MsgConfig {
//todo 定义一个字符串型的bean
public String msg() {
return "bean msg";
}
}测试类注入该bean,使用注解Import加载当前测试类专用配置
1
2
3
4
5
6
7
8
9
10
11
public class ConfigurationTest {
private String msg;
public void test1() {
System.out.println(msg);
}
}Web环境模拟测试
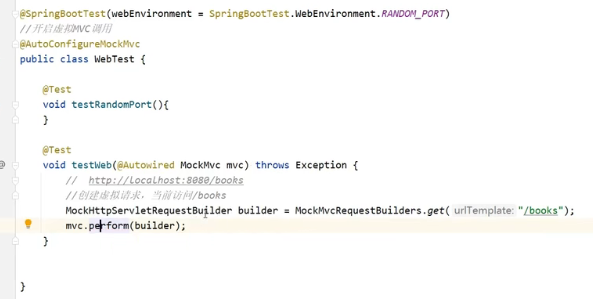
在需要测试的类中的@SpringBootTest注解里面添加以下属性webEnvironment = SpringBootTest.WebEnvironment.RANDOM_PORT
随机端口
1 |
|
自定义端口
1 |
|
其他测试 -> p80-p83(黑马程序员SpringBoot2全套视频教程)
数据层测试回滚
为测试用例添加事务,SpringBoot 会对测试用例对应的事务提交操作进行回滚
1 |
|
如果想在测试用例中提交事务,可以通过@Rollback注解设置
1 |
|
测试用例数据设定
定义数据
1 | test: |
新建实体类,注册为组件并将配置文件属性注入
1 |
|
测试
1 |
|
数据层解决方案
SQL
数据源
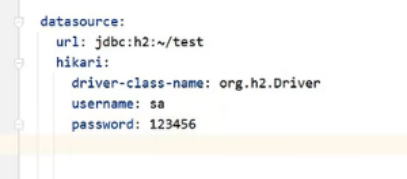
SpringBoot提供了3种内嵌的数据源对象供开发者选择
- HikariCP:默认内置数据源对象
- Tomcat提供DataSource: HikariCP不可用的情况下,且在web环境中,将使用tomcat服务器配置的数据源对象
- Commons DBCP: Hikari不可用, tomcat数据源也不可用,将使用dbcp数据源
通用配置无法设置具体的数据源配置信息,仅提供基本的连接相关配置,如需配置,在下一级配置中设置具体设定
1 | # todo 配置数据库相关信息 |
JDBCTemplate-数据层解决方案
todo:内置持久化解决方案一JdbcTemplate
导包
1
2
3
4
5<!--todo 引入jdbcTemplate-->
<dependency>
<groupId>org.springframework.boot</groupId>
<artifactId>spring-boot-starter-jdbc</artifactId>
</dependency>默认查询使用方式
1
2
3
4
5
6
void test1( JdbcTemplate jdbcTemplate) {
String sql = "select * from books";
List<Map<String, Object>> maps = jdbcTemplate.queryForList(sql);
System.out.println(maps);
}自定义返回格式查询方式
1
2
3
4
5
6
7
8
9
10
11
12
13
14
15
16
17
void test2( JdbcTemplate jdbcTemplate) {
String sql = "select * from tbl_book";
RowMapper<Book> rm = new RowMapper<Book>() {
public Book mapRow(ResultSet rs, int rowNum) throws SQLException {
Book temp = new Book();
temp.setId(rs.getInt("id"));
temp.setName(rs.getString("name"));
temp.setType(rs.getString("type"));
temp.setDescription(rs.getString("description"));
return temp;
}
};
List<Book> list = jdbcTemplate.query(sql, rm);
System.out.println(list);
}新增数据
1
2
3
4
5
void test3( JdbcTemplate jdbcTemplate) {
String sql = "insert into tbl_book values(null ,'1','2','3')";
jdbcTemplate.update(sql);
}内嵌数据库
SpringBoot提供了3种内嵌数据库供开发者选择,提高开发测试效率
- H2
- HSQL
- Derby
NoSQL
市面上常见的NoSQL解决方案
Redis
实用开发篇-89-redis下载安装与基本使用_哔哩哔哩_bilibili
- 支持多种数据存储格式
- 支持持久化
- 支持集群
Mongo
ES
整合第三方技术
缓存
- 缓存是一种介于数据永久存储介质与数据应用之间的数据临时存储介质
- 使用缓存可以有效的减少低速数据读取过程的次数(例如磁盘I0) ,提高系统性能
- 缓存不仅可以用于提高永久性存储介质的数据读取效率,还可以提供临时的数据存储空间
模拟缓存:使用成员变量存储已查询数据,下次查询时直接取出即可
1 |
|
spring boot缓存技术
使用步骤:
启用缓存
导入坐标
1
2
3
4
5<!--todo 1.缓存依赖-->
<dependency>
<groupId>org.springframework.boot</groupId>
<artifactId>spring-boot-starter-cache</artifactId>
</dependency>主入口函数开启缓存
1
2
3
4
5
6
7
8
9
//todo 2.开启缓存
public class SpringBoot14CacheApplication {
public static void main(String[] args) {
SpringApplication.run(SpringBoot14CacheApplication.class, args);
}
}Service设置进入缓存的数据
设置读取缓存的数据
1
2
3
4
5
//todo 3.开启缓存,value:缓存存储空间,key:缓存存储位置
public Book getBookById(int id) {
return bookMapper.selectById(id);
}SpringBoot提供的缓存技术除了提供默认的缓存方案,还可以对其他缓存技术进行整合,统一接口, 方便缓存技术的开发与管理
- Generic
- JCache
- Ehcache
- Hazelcast
- Infinispan
- Couchbase
- Redis
- Caffenine
- simple (默认)
- memcached
生成验证码
创建验证码实体类
1
2
3
4
5
6
//todo 1.创建SMS验证码实体类
public class SMSCode {
private String tele;
private String code;
}Service接口层编写发送验证码以及验证验证码方法
1
2
3
4public interface SMSCodeService {
String sendCodeToSMS(String tele);
boolean checkCode(SMSCode smsCode);
}创建工具类根据手机号码生成验证码
1
2
3
4
5
6
7
8
9
10
11
12
13
14
15
16
17
18
19
20
21
22
23
24
public class CodeUtils {
private String[] patch = {"000000", "00000", "0000", "000", "00", "0", ""};
public String generator(String tele) {
int hash = tele.hashCode();
int encryption = 20220913;
long result = hash ^ encryption; //异或操作
long nowTime = System.currentTimeMillis(); //保证唯一性
result = result ^ nowTime;
long code = result % 1000000;
//return code + "";
code = code < 0 ? -code: code; //取正数
String codeStr = code + "";
int len = codeStr.length();
return patch[len] + codeStr; //自动补零
}
public String get(String tele) {
return null; //有值则返回对应值,否则默认返回null
}
}Controller层实现接口
1
2
3
4
5
6
7
8
9
10
11
12
13
14
15
16
public class MsgController2 {
private SMSCodeService smsCodeService;
public String getCode(String tele) {
return smsCodeService.sendCodeToSMS(tele);
}
public boolean checkCode(SMSCode smsCode) {
return smsCodeService.checkCode(smsCode);
}
}Service实现类层完成方法编写
1
2
3
4
5
6
7
8
9
10
11
12
13
14
15
16
17
18
19
20
21
public class SMSCodeServiceImpl implements SMSCodeService{
private CodeUtils codeUtils;
//todo 4.将生成的验证码存入缓存中,这里使用CachePut,每次重新请求都会重新写入验证码
public String sendCodeToSMS(String tele) {
String code = codeUtils.generator(tele);
return code;
}
public boolean checkCode(SMSCode smsCode) {
//取出内存中的验证码与传递的验证码进行对比,相同返回true
String code = smsCode.getCode();
String cacheCode = codeUtils.get(smsCode.getTele());
return code.equals(cacheCode);
}
}ehcache实现验证码
使用springboot官方提供的部分缓存技术,不需要修改到源码即可进行缓存相关处理
引入坐标
1
2
3
4
5<!--todo 引入ehcache-->
<dependency>
<groupId>net.sf.ehcache</groupId>
<artifactId>ehcache</artifactId>
</dependency>主配置文件配置对应缓存
1
2
3
4
5
6
7
8
9
10spring:
#todo 缓存设置
cache:
#缓存类型,默认为simple
type: ehcache
#缓存存储位置
ehcache:
config: classpath:ehcache.xml
#报错解决Cache configuration does not exist 'ServletContext resource [/ehcache.xml]'
#https://blog.csdn.net/oYuWoXiangGuan3/article/details/109290314配置缓存相关设置
1
2
3
4
5
6
7
8
9
10
11
12
13
14
15
16
17
18
19
20
21
22
23
24
25
26
27
28
29
30
31
32
33
34
35
36
37
<ehcache xmlns:xsi="http://www.w3.org/2001/XMLSchema-instance"
xsi:noNamespaceSchemaLocation="http://ehcache.org/ehcache.xsd">
<!-- 磁盘缓存位置 -->
<diskStore path="D:\ehcache"/>
<!--https://www.cnblogs.com/myseries/p/11370109.html-->
<!--默认缓存策略-->
<!-- external: 是否永久存在,设置为true则不会被清除,此时与timeout冲突, 通常设置为false-->
<!-- diskPersistent:是否启用磁盘持久化-->
<!-- maxElementsInMemory: 最大缓存数量-->
<!-- overflowToDisk: 超过最大缓存数量是否持久化到磁盘-->
<!-- timeToIdleSeconds: 最大不活动间隔,设置过长缓存容易溢出,设置过短无效果,可用于记录时效性数据,例如验证码-->
<!-- timeToLiveSeconds; 最大存活时间-->
<!-- memoryStoreEvictionPolicy; 缓存清除策略-->
<!-- 默认缓存 -->
<defaultCache
eternal="false"
diskPersistent="false"
maxElementsInMemory="1000"
overflowToDisk="false"
timeToIdleSeconds="60"
timeToLiveSeconds="60"
memoryStoreEvictionPolicy="LRU">
<!--<persistence strategy="localTempSwap"/>-->
</defaultCache>
<!-- 自定义缓存 -->
<cache name="smsCode"
eternal="false"
diskPersistent="false"
maxElementsInMemory="1000"
overflowToDisk="false"
timeToIdleSeconds="60"
timeToLiveSeconds="60"
memoryStoreEvictionPolicy="LRU"/>
</ehcache>redis实现验证码缓存
步骤同ehcache一致,只是redis的相关配置不需要另起文件进行配置,只需要在yml主配置文件里面进行配置即可
导入依赖
1
2
3
4<dependency>
<groupId>org.springframework.boot</groupId>
<artifactId>spring-boot-starter-data-redis</artifactId>
</dependency>主配置文件引入redis缓存
1
2
3spring:
cache:
type: redisredis相关配置
1
2
3
4
5
6
7
8
9
10spring:
cache:
redis:
cache-null-values: false #空值
key-prefix: test_ #key前缀名
use-key-prefix: false #key前缀
time-to-live: 10s #数据过期时间
redis:
host: localhost
port: 6379memcached
memcached - a distributed memory object caching system
Windows 下安装 Memcached | 菜鸟教程 (runoob.com)
memcached客户端选择
- Memcached Client for Java: 最早期客户端,稳定可靠,用户群广
- SpyMemcached:效率更高
- Xmemcached: 并发处理更好
SpringBoot未提供对memcached的整合,需要使用硬编码方式实现客户端初始化管理,实现方式如下:以验证码为例
导入坐标
1
2
3
4
5
6
7<!--todo 引入memcached-->
<!-- https://mvnrepository.com/artifact/com.googlecode.xmemcached/xmemcached -->
<dependency>
<groupId>com.googlecode.xmemcached</groupId>
<artifactId>xmemcached</artifactId>
<version>2.4.7</version>
</dependency>编写config类用于创建并返回一个memcachedClient的bean
1
2
3
4
5
6
7
8
9
10
11
12
13
14
15
16
17
18
19
20
21
22
23
24
25
26
27package com.example.config;
import net.rubyeye.xmemcached.MemcachedClient;
import net.rubyeye.xmemcached.MemcachedClientBuilder;
import net.rubyeye.xmemcached.XMemcachedClientBuilder;
import org.springframework.beans.factory.annotation.Autowired;
import org.springframework.context.annotation.Bean;
import org.springframework.context.annotation.Configuration;
import java.io.IOException;
public class XMemcachedConfig {
XMemcachedProperties xMemcachedProperties;
public MemcachedClient getMemcachedClient() throws IOException {
MemcachedClientBuilder memcachedClientBuilder = new XMemcachedClientBuilder(xMemcachedProperties.getServers());
memcachedClientBuilder.setConnectionPoolSize(xMemcachedProperties.getPoolSize());
memcachedClientBuilder.setOpTimeout(xMemcachedProperties.getOpTimeout());
MemcachedClient memcachedClient = memcachedClientBuilder.build();
return memcachedClient;
}
}在主配置文件编写相关缓存配置属性并在后面创建MemcachedProperties类时注入
1
2
3
4
5# todo memcached
memcached:
servers: localhost:11211
poolSize: 10
opTimeout: 3000编写MemcachedProperties类用于该缓存的相关配置
1
2
3
4
5
6
7
8
9
10
11
12
13
14package com.example.config;
import lombok.Data;
import org.springframework.boot.context.properties.ConfigurationProperties;
import org.springframework.stereotype.Component;
public class XMemcachedProperties {
private String servers;
private int poolSize;
private long opTimeout;
}SMSCodeServiceImpl 实现验证码创建和验证功能
1
2
3
4
5
6
7
8
9
10
11
12
13
14
15
16
17
18
19
20
21
22
23
24
25
26
27
public class SMSCodeServiceImpl implements SMSCodeService {
private CodeUtils codeUtils;
private MemcachedClient memcachedClient;
public String sendCodeToSMS(String tele) {
String code = codeUtils.generator(tele);
try {
memcachedClient.set(tele,8,code);
} catch (Exception e) {
e.printStackTrace();
}
return code;
}
public boolean checkCode(SMSCode smsCode) {
String code = null;
try {
code = memcachedClient.get(smsCode.getTele()).toString();
} catch (Exception e) {
e.printStackTrace();
}
return smsCode.getCode().equals(code);
}
}影响数据淘汰的相关配置
检测易失数据(可能会过期的数据集server.db[i].expires )
- volatile-lru: 挑选最近最少使用的数据淘汰
- volatile-lfu: 挑选最近使用次数最少的数据淘汰
- volatile-ttl: 挑选将要过期的数据淘汰
- volatile-random:任意选择数据淘汰
jetCache
jetCache对SpringCache进行了封装,在原有功能基础上实现了多级缓存、缓存统计、自动刷新、异步调用、数据报表等功能,可以整合与统一多种缓存的配置方式,免去上面不同缓存供应商的不同设置方法
jetCache设定了本地缓存与远程缓存的多级缓存解决方案
- 本地缓存 (local)
- LinkedHashMap
- Caffeine
- 远程缓存(remote)
- Redis
- Tair
使用体验
一、远程缓存体验
导入依赖(不要导入2.7及以上版本,因为在这个案例不适用)
1
2
3
4
5<dependency>
<groupId>com.alicp.jetcache</groupId>
<artifactId>jetcache-starter-redis</artifactId>
<version>2.6.5</version>
</dependency>主配置文件进行jetcache配置
1
2
3
4
5
6
7
8
9
10
11
12
13
14
15# todo 2. jetcache相关设置
jetcache:
areaInCacheName: false #是否将域名设置在缓存键名前缀
statIntervalMinutes: 1 #缓存统计
#远程缓存
remote:
default:
type: redis
host: localhost
port: 6379
keyConvertor: fastjson
valueEncode: java #序列化前
valueDecode: java #序列化后
poolConfig:
maxTotal: 50 #容纳池default为缓存的默认配置,你也可以针对个性化需求进行别名配置,如下,进行一个名为sms的缓存配置
1
2
3
4
5
6
7
8
9jetcache:
#远程缓存
remote:
sms:
type: redis
host: localhost
port: 6379
poolConfig:
maxTotal: 50在应用主入口开启缓存功能
1
2
3
4
5
6
7
8
9
//todo 开启该缓存功能
public class SpringBoot15JetcacheApplication {
public static void main(String[] args) {
SpringApplication.run(SpringBoot15JetcacheApplication.class, args);
}
}导入并使用缓存
1
2
private Cache<String, String> jetCache;存入缓存
1
2
3
4
5
6
public String sendCodeToSMS(String tele) {
String code = codeUtils.generator(tele);
jetCache.put(tele, code);
return code;
}取出缓存
1
2
3
4
5
6
public boolean checkCode(SMSCode smsCode) {
//取出内存中的验证码与传递的验证码进行对比,相同返回true
String code = jetCache.get(smsCode.getTele());
return smsCode.getCode().equals(code);
}二、本地缓存体验
设置本地缓存
1
2
3
4
5
6
7
8
9jetcache:
#本地缓存
local:
default:
type: linkedhashmap
keyConvertor: fastjson
sms:
type: linkedhashmap
keyConvertor: fastjson使用:将
cacheType = CacheType.REMOTE改为cacheType = CacheType.LOCAL即可
三、方法使用缓存
在主应用入口开启方法缓存功能
@EnableMethodCache(basePackages = "开启缓存的包名")1
2
3
4
5
6
7
8
//todo 3.开启该缓存功能
//todo 方法缓存开启
public class SpringBoot15JetcacheApplication {
public static void main(String[] args) {
SpringApplication.run(SpringBoot15JetcacheApplication.class, args);
}
}在需要缓存的实体类需进行序列化操作
1
2
3
4
5
6
7
8//todo 缓存实体类需序列化
public class Book implements Serializable {
private int id;
private String type;
private String name;
private String description;
}查询时存入缓存
1
2
3
4
5
6
//todo 缓存设置
//@CacheRefresh(refresh = 10)//todo 缓存更新时间
public Book getBookById(int id) {
return bookMapper.selectById(id);
}更新数据时同步更新缓存
1
2
3
4
5
//todo 更新数据时更新缓存
public boolean update(Book book) {
return bookMapper.updateById(book) > 0;
}删除数据时删除对应缓存
1
2
3
4
5
//todo 删除数据时删除对应缓存
public boolean delete(int id) {
return bookMapper.deleteById(id) > 0;
}j2cache
J2Cache是开源的两级缓存框架(要求至少 Java 8)。第一级缓存使用内存(同时支持 Ehcache 2.x、Ehcache 3.x 和 Caffeine),第二级缓存使用 Redis(推荐)/Memcached 。 由于大量的缓存读取会导致 L2 的网络成为整个系统的瓶颈,因此 L1 的目标是降低对 L2 的读取次数。 该缓存框架主要用于集群环境中。单机也可使用,用于避免应用重启导致的缓存冷启动后对后端业务的冲击。
使用体验
导包
1
2
3
4
5
6
7
8
9
10
11
12
13<!--todo 导入依赖-->
<!-- https://mvnrepository.com/artifact/net.oschina.j2cache/j2cache-core -->
<dependency>
<groupId>net.oschina.j2cache</groupId>
<artifactId>j2cache-core</artifactId>
<version>2.8.5-release</version>
</dependency>
<!-- https://mvnrepository.com/artifact/net.oschina.j2cache/j2cache-spring-boot2-starter -->
<dependency>
<groupId>net.oschina.j2cache</groupId>
<artifactId>j2cache-spring-boot2-starter</artifactId>
<version>2.8.0-release</version>
</dependency>因为后面的一级缓存需要用到ehcache,所以这里导入ehcache
1
2
3
4
5<!--todo 引入ehcache-->
<dependency>
<groupId>net.sf.ehcache</groupId>
<artifactId>ehcache</artifactId>
</dependency>在主入口配置文件配置j2cache
1
2
3#配置j2cache
j2cache:
config-location: j2cache.properties配置
j2cache.properties分别需要配置一级缓存以及二级缓存并设置对应的配置文件,以及一级缓存到达二级缓存的方式
一级缓存
1
2
3
4
5# 一级缓存
#指定一级缓存类型
j2cache.L1.provider_class = ehcache
#指定ehcache配置文件位置
ehcache.configXml = ehcache.xml二级缓存
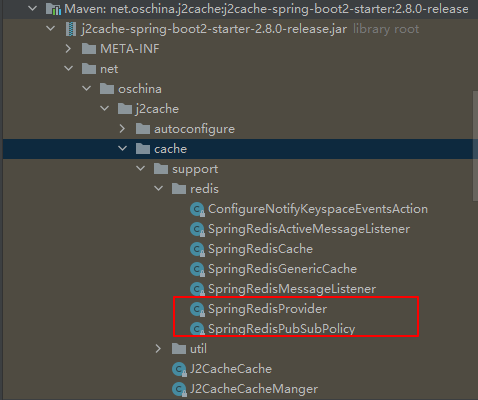
这里面的二级缓存以及第三步引用的类可以从libary查找,直接进到该方法并复制完整类名即可
二级缓存的相关配置可以不用创建新文件去进行,可直接用redis.的方式配置
1
2
3
4
5
6
7
8
9
10# 二级缓存
j2cache.L2.provider_class = net.oschina.j2cache.cache.support.redis.SpringRedisProvider
j2cache.L2.config_section = redis
redis.hosts = localhost:6379
#设置单例模式
redis.mode = single
#存储空间
redis.namespace = j2cache
#是否启用二级缓存
j2cache.L2-cache-open = false一级缓存到二级缓存配置
1
2# 一级缓存数据到达二级缓存
j2cache.broadcast = net.oschina.j2cache.cache.support.redis.SpringRedisPubSubPolicy全部代码
1
2
3
4
5
6
7
8
9
10
11
12
13
14
15
16
17
18
19
20
21#todo j2cache配置
# 一级缓存
#指定一级缓存类型
j2cache.L1.provider_class = ehcache
#指定ehcache配置文件位置
ehcache.configXml = ehcache.xml
# 二级缓存
j2cache.L2.provider_class = net.oschina.j2cache.cache.support.redis.SpringRedisProvider
j2cache.L2.config_section = redis
redis.hosts = localhost:6379
#设置单例模式
redis.mode = single
#存储空间
redis.namespace = j2cache
#是否启用二级缓存
j2cache.L2-cache-open = false
# 一级缓存数据到达二级缓存
j2cache.broadcast = net.oschina.j2cache.cache.support.redis.SpringRedisPubSubPolicy
配置一级缓存对应的配置文件
ehcache.xml,同之前教程一致1
2
3
4
5
6
7
8
9
10
11
12
13
14
15
16
17
18
19
20
21
22
23
24
25
26
27
28
<ehcache xmlns:xsi="http://www.w3.org/2001/XMLSchema-instance"
xsi:noNamespaceSchemaLocation="http://ehcache.org/ehcache.xsd">
<!-- 磁盘缓存位置 -->
<diskStore path="D:\ehcache"/>
<!-- 默认缓存 -->
<defaultCache
eternal="false"
diskPersistent="false"
maxElementsInMemory="1000"
overflowToDisk="false"
timeToIdleSeconds="10"
timeToLiveSeconds="10"
memoryStoreEvictionPolicy="LRU">
<!--<persistence strategy="localTempSwap"/>-->
</defaultCache>
<!-- 自定义缓存 -->
<cache name="smsCode"
eternal="false"
diskPersistent="false"
maxElementsInMemory="1000"
overflowToDisk="false"
timeToIdleSeconds="60"
timeToLiveSeconds="60"
memoryStoreEvictionPolicy="LRU"/>
</ehcache>使用缓存,直接在需要使用的地方引入该缓存实现类即可
1
2
3
4
5
6
7
8
9
10
11
12
13
14
15
16
17
18
19
20
21
22
23
24
25//todo 使用缓存
public class SMSCodeServiceImpl implements SMSCodeService {
private CodeUtils codeUtils;
//todo 引入缓存
private CacheChannel cacheChannel;
public String sendCodeToSMS(String tele) {
String code = codeUtils.generator(tele);
cacheChannel.set("sms", tele, code);//设置缓存,缓存空间,键名,值
return code;
}
public boolean checkCode(SMSCode smsCode) {
String code = cacheChannel.get("sms", smsCode.getTele()).asString(); //读取缓存并转化为字符串
return smsCode.getCode().equals(code);
}
}任务
定时任务是企业级应用中的常见操作
- 年度报表
- 缓存统计报告
市面上流行的定时任务技术
- Quartz
- Spring Task
Timer
使用Java内置apiTimer进行定时器操作
创建定时器对象
1
Timer timer = new Timer(); //todo 创建定时器
创建目标任务
1
2
3
4
5
6TimerTask task = new TimerTask() { //todo 创建定时任务
public void run() {
System.out.println("timer task run...");
}
};定时器操作任务
1
timer.schedule(task,0,2000);//todo 定时器执行定时任务
Quartz
相关概念:
- 工作 (Job) :用于定义具体执行的工作
- 工作明细 (JobDetail) :用于描述定时工作相关的信息
- 触发器(Trigger) :用于描述触发工作的规则,通常使用cron表达式定义调度规则
- 调度器(Scheduler) :描述了工作明细与触发器的对应关系
执行定时任务
导入quartz坐标
1
2
3
4
5<!--todo 导入quartz-->
<dependency>
<groupId>org.springframework.boot</groupId>
<artifactId>spring-boot-starter-quartz</artifactId>
</dependency>编写工作-执行任务
工作需继承QuartzJobBean类
1
2
3
4
5
6public class MyQuartz extends QuartzJobBean {
protected void executeInternal(JobExecutionContext context) throws JobExecutionException {
System.out.println("quartz task run..."); // TODO: 2022/9/15 具体执行的工作
}
}编写工作明细-绑定任务
创建Confiiguration类
1
2
3
public class QuartzConfig {
}编写工作明细,绑定具体工作,返回一个bean
1
2
3
4
5
public JobDetail printJobDetail() {
// TODO: 2022/9/15 绑定具体的工作
return JobBuilder.newJob(MyQuartz.class).storeDurably().build();
}编写触发器-绑定工作明细
1
2
3
4
5
6
7
public Trigger printJobTrigger() {
// TODO: 2022/9/16 定时器的参数设置
ScheduleBuilder schedBuild = CronScheduleBuilder.cronSchedule("0/5 * * * * ?");
// TODO: 2022/9/15 绑定具体的工作明细
return TriggerBuilder.newTrigger().forJob(this.printJobDetail()).withSchedule(schedBuild).build();
}Spring Task
主应用入口开启定时器功能
1
2
3
4
5
6
7
8
9
//todo 开启定时器功能
public class SpringBoot17TaskApplication {
public static void main(String[] args) {
SpringApplication.run(SpringBoot17TaskApplication.class, args);
}
}编写任务并注入spring
1
2
3
4
5
6//注入spring
public class MySpringTask {
public void print() {
System.out.println(Thread.currentThread().getName() + "_spring task run ...");
}
}在需要执行的方法配置定时任务相关设置
1
2
3
4//todo 定时任务执行间隔时间
public void print() {
System.out.println(Thread.currentThread().getName() + "_spring task run ...");
}可以针对定时任务进行相关个性化配置
1 | spring: |
邮件
消息队列(重要,后面补)
监控
监控的意义
- 监控服务状态是否宕机
- 监控服务运行指标(内存、虚拟机、线程、请求等)
- 监控日志
- 管理服务(服务下线)
可视化监控平台(Spring Boot Admin)
监控的实施方式:
- 显示监控信息的服务器:用于获取服务信息,并显示对应的信息
- 运行的服务:启动时主动.上报,告知监控服务器自己需要受到监控
Spring Boot Admin:开源社区项目,用于管理和监控SpringBoot应用程序。客户端注册到服务端后,通过HTTP
请求方式,服务端定期从客户端获取对应的信息,并通过UI界面展示对应信息
使用方式:
Admin服务端配置方式
导入坐标
1
2
3
4
5<dependency>
<groupId>de.codecentric</groupId>
<artifactId>spring-boot-admin-starter-server</artifactId>
<version>2.7.3</version>
</dependency>主应用入口开启监控功能
@EnableAdminServer1
2
3
4
5
6
7
8
public class SpringBoot18MonitorApplication {
public static void main(String[] args) {
SpringApplication.run(SpringBoot18MonitorApplication.class, args);
}
}配置服务端端口
1
2server:
port: 8081
Admin客户端配置方式
导入坐标
1
2
3
4
5<dependency>
<groupId>de.codecentric</groupId>
<artifactId>spring-boot-admin-starter-client</artifactId>
<version>2.7.3</version>
</dependency>配置文件配置监控目标服务器地址
1
2
3
4
5
6# 18-监控目标服务器地址
spring:
boot:
admin:
client:
url: http://localhost:8081开放相关健康指标数据
1
2
3
4management:
endpoint:
health:
show-details: always #开放信息详情开放所有相关指标数据
1
2
3
4
5management:
endpoints:
web:
exposure:
include: "*" #暴露所有监控web端点监控原理(待完善)
- Actuator提供了SpringBoot生产就绪功能,通过端点的配置与访问,获取端点信息
- 端点描述了一组监控信息,SpringBoot提供了多个内置端点,也可以根据需要自定义端点信息
- 访问当前应用所有端点信息: /actuator
- 访问端点详细信息: /actuator/端点名称
| ID | 描述 | 默认启用 |
|---|---|---|
| loggers | 显示和修改应用程序中日志记录器的配置 | 是 |
| liquibase | 显示已应用的Liquibase 数据库迁移 | 是 |
| metrics | 显示当前应用程序的指标度量信息 | 是 |
| mappings | 显示所有@RequestMapping路径的整理清单 | 是 |
| scheduledtasks | 显示应用程序中的调度任务 | 是 |
| sessions | 允许从Spring Session支持的会话存储中检索和删除用户会话。当使用Spring Session的响应式Web应用程序支持时不可用 | 是 |
| shutdown | 正常关闭应用程序 | 否 |
| threaddump | 执行线程dump | 是 |
启用指定端点,其中health是必须启动的端点
1 | management: |
启用所有端点
1 | management: |
web开放端口:
1 | management: |
控制台提示信息:2022-09-17 11:05:29.043 INFO 22732 --- [ main] o.s.b.a.e.web.EndpointLinksResolver : Exposing 2 endpoint(s) beneath base path '/actuator'
java自带监视与管理平台:开启方式:控制台输入jconsole
自定义监控指标
info端点指标控制
开启info端点指标
1
2
3
4
5management:
#开启info端点指标
info:
env:
enabled: true静态信息定义
1
2
3
4
5
6#静态信息info
info:
appName: @project.artifactId@
version: @project.version@
company: Dong-yyy
author: Dong动态信息定义
编写类注入spring并实现InfoContributor接口
1
2
3
4
public class InfoConfig implements InfoContributor {
}重写contribute方法,使用
builder.withDetail方法写入info数据(键值对形式写入),也可以直接传入map1
2
3
4
5
6
7
public void contribute(Info.Builder builder) {
builder.withDetail("runTime", System.currentTimeMillis()); //直接写入数据
Map infoMap = new HashMap();
infoMap.put("buildTime", "2022");
builder.withDetails(infoMap);//传入map
}
health端点指标控制
health会对引入的依赖进行监控,若有一个有问题则会显示DOWN
可以自定义对组件的状态进行监听
创建类注入Spring并继承AbstractHealthIndicator类
1
2
3
4
public class HealthConfig extends AbstractHealthIndicator {
}实现
doHealthCheck方法分别对不同状态进行信息展示以及health状态控制
1
2
3
4
5
6
7
8
9
10
11
12
13
14
15
16
17
protected void doHealthCheck(Health.Builder builder) throws Exception {
// TODO: 2022/9/17 模拟根据组件状态赋值
Boolean condition = false;
if (condition) {
// TODO: 2022/9/17 设置HealthConfig信息
builder.withDetail("runTime", System.currentTimeMillis()); //直接写入数据
Map infoMap = new HashMap();
infoMap.put("buildTime", "2022");
builder.withDetails(infoMap);//传入map
builder.up();//设置状态为上线
}else {
builder.withDetail("状态","有毒☠");
//builder.down();//设置状态为下线
builder.status(Status.DOWN);//建议写的通俗易懂
}
}
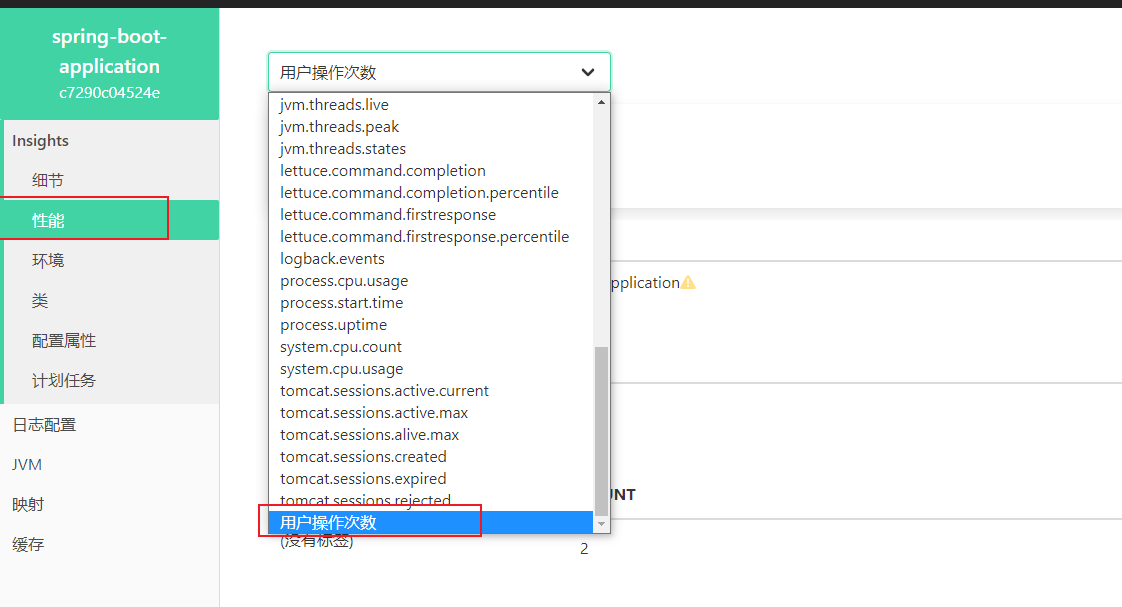
metrics(性能)端点指标控制
可以自定义性能中的操作
- 再需要操作的业务层service定义一个变量记录执行次数
- 在无参构造函数种去初始化该操作
- 需要绑定的操作去增加执行次数
1 | private Counter counter; |
自定义端点
定义一个配置类注入spring并加上端点注解
Endpoint1
2
3
4
5
public class PayEndpoint {
}配置读取端点调用方法的注解
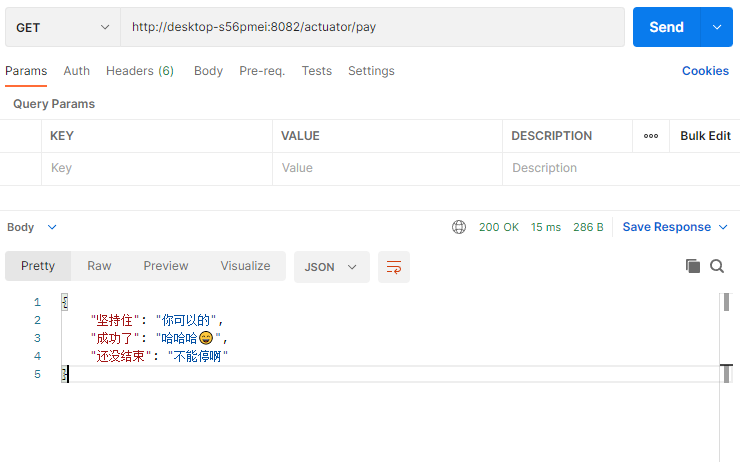
@ReadOperation1
2
3
4
5
public Object getPay() {
System.out.println("hhh"); //控制台打印信息
}书写返回数据
1
2
3
4
5
6
7
8
9
10
public Object getPay() {
System.out.println("hhh"); //控制台打印信息
Map hashMap = new HashMap();
hashMap.put("还没结束","不能停啊");
hashMap.put("坚持住","你可以的");
hashMap.put("成功了","哈哈哈😄");
return hashMap; //接口返回信息
}
原理
起步依赖原理
就是查看springboot的依赖
- 在spring-boot-starter-parent中定义了各种技术的版本信息,组合了一套最优搭配的技术版本。
- 在各种starter中,定义了完成该功能需要的坐标合集,其中大部分版本信息来自于父工程。
- 我们的工程继承parent,引入starter后,通过依赖传递,就可以简单方便获得需要的jar包,并且不会存在版本冲突等问题
